
|
|
Tech Note 05b: Writing and Adapting Shared LibrariesJanuary 31, 2006© NS BASIC Corporation. All rights reserved. |
NSBasic and compiled languages are very different. Compiled languages use compile-time type checking. NSBasic is a compiled/interpreted language with a mixture of compile-time and dynamic types. Due to this, you must take some care according to certain rules when building and using shared libraries. You cannot use just any old shared library with NSBasic. Fortunately, if you have a shared library that does not follow the rules, you can always write another shared library which is just a wrapper around the difficult library.
Shared libraries can be written in many systems including CodeWarrior and GCC, and a Pascal example is provided at the end of this tech note. Most shared libraries for NSBasic have been written in C under CodeWarrior, and the majority of this tech note refers to CodeWarrior.
NSBasic uses conventions derived from the excellent MathLib library. They are as follows:
Int16 or UInt16 reference number. This is standard practice for shared libraries.Err OpenFunction(UInt16 refNum, UInt16 version) Err OpenFunction(UInt16 refNum) Err CloseFunction(UInt16 refNum, UInt16 *useCount) Err CloseFunction(UInt16 refNum)The second form is preferred, but NSBasic will work with both.
There are two tasks to complete when writing a shared library. One is to write the information file. The other is to write the shared library itself. If you are adapting an existing shared library that satisfies the conditions above, you will only need to write the information file.
The information file for a library provides information for the NSBasic IDE to determine how to call the library. Its name always ends in .inf and it resides in the Lib subdirectory of the NSBasic install directory (e.g. C:\NSBasic\Lib).
There are two versions of information files. Version 2 is recommended for all new development and is the only version described here.
A simple information file might look something like this:
[General]
ExtensionName=Test-library
PrcName=TestLib.prc
Version=2.0 Beta
Manufacturer=NSBasic.com
InfVers=2.0

=HelpStart=
""
"Test Shared Library"
""
"This library is just a test"
=HelpEnd=

[GlobalMethods]
Multiply=1,func,2,"Multiply(in a as double, in b as double) as double"
ChangeStatus=2,proc,1, "ChangeStatus(in a as integer)"
Each line consists of several fields. First is the name of the function or subroutine, separate by the index with an equals sign. The index should start as 1 and be incremented for successive lines. Then there is the word func, indicating a function that returns a value, or proc, indicating a subroutine. Next is the number of parameters to the subroutine or function. Finally there is a description of the function or subroutine.
The function or subroutine description looks much like a declaration in NSBasic, with a few twists to give the compiler important information. Consider the ChangeStatus subroutine:
ChangeStatus(in a as integer)
This specifies a subroutine that takes one parameter. "In a as integer" means that there is a parameter, a, which is an Integer. It also specifies that this is an in parameter. There are three kinds of parameters: in, out, and inout (one word). In parameters are used when a value should just be passed to the shared library function by value. In the case of in arguments, the C code of the shared library expects a simple type such as double or Int16. Out and inout parameters are used when a value must come out of or go in and come out of a shared library function. In the case of out and inout arguments, the C code expects a pointer to a type, such as double* or Int16. String and Byte parameters are always passed by pointer.
Type names are not case sensitive.
To make information files accessible both to people who prefer C and to people who prefer NSBasic, some types can be specified in many ways:
| NSBasic Type | C Types | Information Types |
|---|---|---|
| Integer | long, Int32, UInt32 | integer, int32, int4, long |
| Short | short | short, int16, int2, int |
| Double, Float | double | double, flt8, flt64 |
| Single | float | float, single, flt4, flt32 |
| String, Byte | char * | string, char |
| Variant | void * | variant |
Many examples of information files are provided with NSBasic.
Writing a shared library for NSBasic is no more difficult than writing any other shared library. If you are starting to write a shared library, you may want to use Palm's SampleLib as a starting point. This is not a good idea. The SampleLib has a mechanism for passing contexts which is not supported in NSBasic.
One of the best ways of writing a shared library is to start with the MathLib shared library. Source to this library is freely downloadable. See http://www.radiks.net/~rhuebner/mathlib.html
You can also write a shared library using CodeWarrior's shared library wizard. This requires that you define all of the functions and subroutines beforehand, as it is awkward to change them after the project is created.
We will use the example of a simple base conversion package called Cnv. It will contain two functions to convert positive to different bases, such as binary and hexadecimal, and vice-versa. We will start the design by imagining how we want to use the library in NSBasic:
Dim s As String
Dim n As Integer
s = Cnv.DecToBase(37, 16)     's will be 37 in base 16
n = Cnv.BaseToDec("177", 8)   'n will be the value of 177 in octal
s = Cnv.DecToBase(42, 10)     'Works like Str for positive integers
When the input is out of range, DecToBase will return a blank string, and BaseToDec will return -1.
There is one more design decision that, strictly speaking, does not need to be made now, but we need to be aware of it. A shared library can either be distributed as a separate .prc file for the user to download to the Palm or embedded within the .prc file that NSBasic creates. We will refer to these kinds of shared libraries as "separate" and "embedded."
Creating an information file is straightforward:
[General]
ExtensionName=Base-Conversion-Library
PrcName=Cnv.prc
Version=1.0 Alpha
InfVers=2.0
Manufacturer=myself

[GlobalMethods]
DecToBase = 1, func, 2, "convertedValue = DecToBase(in n as integer, in base as Integer) as String"
BaseToDec = 2, func, 2, "decValue = BaseToDec(in s as String, in base as Integer) as integer"
Now to create the project, start up CodeWarrior and close any files it may remember from the previous session. Pull down New... from the File menu. Make sure the Project tab is chosen. Select Palm OS Shared Library Wizard, enter Cnv in the Project name field, choose an appropriate destination, and press OK.
You will then see a window with four fields. The default values for all four fields will work. For production work, it is srtongly recommended that you get a unique creator ID from Palm at this point. The process is free and painless; just press the Visit Creator ID Website and follow the directions. However, as this is to be used for testing purposes only, we can leave the creator ID as STRT. Press the Next > button and dismiss the warning dialog window that comes up.
Now you will see a window for adding function names. Enter all the functions and procedures in your .inf file in order. Press Add and type DecToBase. Press Add again and type BaseToDec. Press Next >.
You will see a window with a list of libraries to add to your project. Most shared libraries do not need to call other libraries. Many of these libraries will not even work within shared libraries. Simply press the Finish button. A new project will appear.
Go into the Source folder. There should be a file called CnvImpl.c. Open this file. CodeWarrior has already produced a lot of useful code for you, including code to handle "global" variables you can use between function calls. It has implemented the CnvOpen, CnvClose, CnvSleep, and CnvWake functions.It has also provided stubs for your the two functions to implement, CnvDecToBase and CnvBaseToDec. (Even though you may have functions and procedures for NSBasic, C uses the word "function" to describe both, and they are implemented the same way.
Take a look at CnvDecToBase. It is declared like this:
Err CnvDecToBase(UInt16 refNum)The "Err" indicates that this function returns an error value. This is not the value returned to NSBasic. All shared library functions for NSBasic should return errNone, indicating no error. The function contains one argument, a refNum. This is always the same. It is the reference number of one particular instance of a shared library. (They are shared, so several applications can use them. Each has a unique reference number.) You will not need to use this unless you want to keep values between function calls, in which case, study the other code that CodeWarrior has provided.
To start implementing this function, we look back at the line in the .inf file:
convertedValue = DecToBase(in n as integer, in base as Integer) as StringUsing the table of type conversions, we can derive the additional arguments:
Argument 1: An Int32
Argument 2: An Int32
Return value: A char *
The return value is always last in the declaration. Using this information, we change the C declaration to the following:
Err CnvDecToBase(UInt16 refNum, Int32 n, Int32 base, char *retVal)We also have to go into Cnv.h, within the Headers directory, and change the declaration to the following:
extern Err CnvDecToBase(UInt16 refNum, Int32 n, Int32 base, char *retVal)
	CNV_LIB_TRAP(sysLibTrapBase + 5);
Similarly, we can use the .inf line for the CnvBaseToDec to change the declarations as follows:
decValue = BaseToDec(in s as String, in base as Integer) as integer

Err CnvBaseToDec(UInt16 refNum, char *s, Int32 base, Int32 *retVal)

extern Err CnvBaseToDec(UInt16 refNum, char *s, Int32 base, Int32 *retVal)
	CNV_LIB_TRAP(sysLibTrapBase + 6);
Note that the return value is declared as a pointer.
Now the only thing left to do is implement the actual functions. Here is one possible implementation, which can be typed or pasted into CodeWarrior, replacing the stubs provided by the wizard:
Err CnvDecToBase(UInt16 refNum, Int32 n, Int32 base, char *retVal)
{
	#pragma unused(refNum)

	if (n < 0 || refNum < 2 || refNum > 32)
	{
	    /* Bad parameters */
	    StrCopy(retVal, "");
	    return errNone;
	}

	*retVal = '\0';
	do
	{
	    char *s;
	    char remainder;

	    /* Open up a space for the next digit */
	    for (s = retVal; *s; ++s){}
	    for (++s; s > retVal; --s)
	    {
	        *s = *(s - 1);
	    }

	    remainder = n % base;

	    if (remainder < 10)
	    {
	        *retVal = '0' + remainder;
	    }
	    else
	    {
	        *retVal = 'A' + (remainder - 10);
	    }

	    n /= base;
	} while (n > 0);

    return errNone;
}


Err CnvBaseToDec(UInt16 refNum, char *s, Int32 base, Int32 *retVal)
{
	#pragma unused(refNum)
	char *runner;

	*retVal = 0;

	if (base < 2 || base > 36)
	{
	    /* Bad parameters */
	    *retVal = -1;
	    return errNone;
	}

	for (runner = s; *runner; ++runner)
	{
	    UInt16 digit;

	    if (*runner >= '0' && *runner <= '9')
	    {
	        digit = *runner - '0';
	    }
	    else if (*runner >= 'A' && *runner <= 'Z')
	    {
	        digit = *runner - 'A' + 10;
	    }
	    else if (*runner >= 'a' && *runner <= 'z')
	    {
	        digit = *runner - 'a' + 10;
	    }
	    else
	    {
	        *retVal = -1;
	        return errNone;
	    }

	    if (digit >= base)
	    {
	        *retVal = -1;
	        return errNone;
	    }

	    *retVal = *retVal * 10 + digit;
	}

    return errNone;
}
Compile the shared library by choosing Make from the Project menu.
If you did not make any errors in typing, it should compile and
produce a file called Cnv.prc.
It is considered good practice in NSBasic shared libraries to include a 'tver' resource with ID 0 consisting of a string with the version number (in this case, "1.0 Devel"). However, CodeWarrior tries to prevent additional resources from being added to shared libraries. Use one of the free, downloadable editors available on the Palm developer web site to add this resource after the file has been created. Now we need to use and test the new shared library in an NSBasic program.
First create a new project to test it. In the Startup Code, insert this line:
LoadLibrary Cnv
We're going to make a simple decimal to hexidecimal converter. Create two text fields, one called Dec and the other called Hex. Then create a button. Within the subroutine of the button, insert these lines:
Dim ins as String
Dim in as Integer
Dim outs as String

    ins = Dec.text
    in = Cnv.BaseToDec(ins, 10)
    outs = Cnv.DecToBase(in, 16)
    Hex.text = outs
Test the new project by running it. If you successfully installed the .inf file, it should compile. However, when it runs, it should produce an error message because the library has not been loaded.
As mentioned before, libraries can be embedded or separate. To get Cnv to work as a separate library, use the Install Application Database menu item from within the Palm OS Emulator to install Cnv.prc.
Now it should work. Enter a decimal number into the Dec field and press the button. Its hexadecimal equivalent should appear in the Hex field.
A new feature allows any number of shared libraries to be embedded in the application. To try this, first delete the Cnv shared library from the Palm OS Emulator. Go back to your NSBasic project. In the Project Explorer, there should be a folder called Resources. There should be no resources yet.
Right-click on the Resources folder and choose Add Resource. Navigate to Cnv.prc, select it, and press Open. A new resource will be added. Change the Resource Type to libr and the name to Cnv and recompile. You may note that the size of the project is a little bigger. This is because the shared library is now present in the project. It should run fine without having to install the shared library separately.
The problem with changing and returning strings is that, in normal C code, the called function has no way of knowing how much memory is allocated to the string. The shared library code ensures that there are at least 300 bytes or the size of the previous returned string, whichever was longer. However, this is not enough for some applications.
Trick 1 is most useful when the string is to be made on the fly based on the input data.
Consider Yuk rewritten this way:
/**
	Yuk generator after Doug Lee
	Returns a sentence of in Yuks

    Yuk(3) => "Yuk, yuk, yuk."
    Yuk(1) => "Yuk."
  */
Err Yuk(UInt16 refNum, short in, Char *ret)
{
    char *s;
    int k;

    if (in <= 0) return 0;

    /* NEW CODE */
    {
    	MemHandle m = MemPtrRecoverHandle(ret - sizeof(Char *));
    	MemHandleUnlock(m);

    	if (0 != MemHandleResize(m, in * 5 * sizeof(Char) + sizeof(Char *)))
    	{
    	    ErrFatalDisplay("Resize failed in Yuk.");
    	}

    	s = MemHandleLock(m);
    	*((Char **) s) = s + sizeof(Char *);
    	s += sizeof(Char *);
    }
    /* END NEW CODE */

    for (k = 0; k < in; ++k)
    {
        if (k)
        {
            *s++ = ',';
            *s++ = ' ';
        }
    	*s++ = k ? 'y' : 'Y';
    	*s++ = 'u';
    	*s++ = 'k';
    }
    *s++ = '.';
    *s = '\0';

    return 0;  // No error
}
For clarity, the new code is in a separate block. It replaces
"s = ret;" in the previous version. Here it is, line by line:
MemHandle m = MemPtrRecoverHandle(ret - sizeof(Char *));
Subtract sizeof(Char *) from ret to make it point to the beginning
of this pointer and recover the handle associated with it.
MemHandleUnlock(m);
The handle will be locked upon entry into the subroutine. Unlock
it. Note that from now on the value given by ret is unreliable
and should not be used.
    	if (0 != MemHandleResize(m, in * 5 * sizeof(Char) + sizeof(Char *)))
    	{
    	    ErrFatalDisplay("Resize failed in Yuk.");
    	}
The structure of the Yuk means that each Yuk uses five characters,
except for the last, which uses only four. With one extra character
needed for the end of string, in * 5 is the right number of bytes
for the string part. It's multiplied by sizeof(Char), which should
always be 1 if Char is the same size as char for purely paranoid
reasons. The addition of sizeof(Char *) is for the pointer that
needs to be at the beginning of the block of memory.
This is only an example; production code should probably have more graceful error recovery than just a fatal display.
s = MemHandleLock(m);
Relock the handle, putting the pointer into s. From now on, s
will be used exclusively, and ret will not be used.
*((Char **) s) = s + sizeof(Char *);
At the first part of *s is a pointer to the rest of s, put it
there. If you don't do this, NSBasic will be unable to find the
string.
s += sizeof(Char *);
Advance s beyond this pointer, because for the rest of the function
we are going to use it as a pointer to the string.
Trick 2 is useful when the return string is fixed in memory and will not change at least until the next shared library call. Perhaps the string is in a database. Perhaps it is some string that is managed by the shared library in some sort of "global" string.
Here is Yuk rewritten this way:
**
	Yuk generator after Doug Lee
	Returns a sentence of in Yuks

    Yuk(3) => "Yuk, yuk, yuk."
    Yuk(1) => "Yuk."
  */
Err Yuk(UInt16 refNum, short in, Char *ret)
{
    char *s;
    int k;

    if (in <= 0) return 0;

    ret -= sizeof(Char *);
    * ((Char **) ret) = HaveSomeYuks(in);

    return 0;  // No error
}
HaveSomeYuks is deliberately undefined, but it should be a function that returns a pointer to some static string.
As part of the return process, this string will be copied into an NSBasic string. However, for long strings, at least this way of writing the function does not use up extra temporary memory beyond this.
Contributed by Ron Glowka.
[Note: This contribution was written when only Version 1 information files were available. Some of the limitations have been removed. -Ed.]
First, you should download the sample Shared Library example project and the NSBasic test program which calls it.
CAUTION: Before I get into my explanations, I need to caution you that one of the functions in this example requires the latest version of the NSBRuntime.prc file - version 1.10.3 or later. This runtime can be downloaded from the "Files" section of the nsbasic-Palm forum. You can choose not to try this function (just don't click on it), but if you do and you don't have NSBRuntime v1.10.3 loaded, your system will likely lock up when you try to exit the program. On my system, it was a soft reset but it still required pushing the reset button on the back of the unit. Without 1.10.3, it appears to work fine, it just locks up when exiting the program. With 1.10.3, it works perfectly. The function in question is the SelectOneTime function. That said...
I adapted this example from the Shared Library example that comes with CodeWarrior v7. I removed a bunch of stuff that wouldn't be needed for an NSBasic Shared Library and I rearranged the code to have all the custom code together and put all the "Standard/Required" code, that you don't need to modify, at the end of the files where you can easily "ignore" them.
This project is meant to be a template for creating other Shared Libraries. It really doesn't do much of anything useful but it should serve as a good starting point. The examples I adapted this from all had function names, variables, structures, etc. that identified a specific library (example: MSLfunc1 (MSL for MySharedLib)). I changed all these to start with the word "THIS_". Anything starting with "THIS" means that it belongs to "this" library. Since this example is only meant for use with NSBasic programs, you can safely leave the "THIS" in your own libraries because NSBasic uses the information in the .inf file and not any identifiers in the code itself. If you need to access your library from a C program, then you will need to try to make unique public identifiers.
The source code and project names also start with "THIS". These too, can be left as is in your own libraries if you separate your libraries into separate project directories. Besides your custom code, all you really need to do is to change the "Targets" settings for the "PalmRez Post Linker" in CodeWarrior to have the correct Output File Name and Creator Id.
I tried to make this example both simple and comprehensive enough to be useful. Global and static variables can not be used in a Shared Library, but globals can be "simulated". This complicates the code somewhat, so I put the global routines in a separate file where they don't have to be looked at unless needed. Even then, all that should be required to use globals is to add your global definitions to the "globals" structure and initialize them if necessary - everything is already initialize to 0's.
You probably really need to look at the project before the above comments make a lot of sense...
To use the Shared Library from NSBasic, you need to make sure that the "SLExample.inf" file is in your "nsbasic\lib" directory. Then, take a look at the NSBasic test project, SLTest.prj, to see how it is using the library. The files you need to download to your device or POSE are: SLExample.prc and SLTest.prc. SLExample.prc is the shared library and will not show up on your application launcher because of its "libr" database type.
The functions in the shared library example are fairly straight-forward. The FldGetSelection... functions use global variables. This is because only one non-string variable type can be returned from a shared library function. FldGetSelection returns both the start and end positions of a selected area in a field. So, the Shared Library example breaks this into 2 functions; FldGetSelectionStart and FldGetSelectionEnd. The FldGetSelectionStart function retrieves both the start and end positions, stores both in "global" variables, but only returns the start position. The FldGetSelectionEnd function only accesses the globals, and returns the end position stored there by the FldGetSelectionStart function.
I'm sure I could have said a lot more, but check this stuff out. Disect the Test program and the Shared Library code. I'll be happy to answer any questions I can.
Ron
This very small and simple tech note is meant to be a template for creating other Shared Libraries
using free PalmOS Pascal
Compiler.
This project really doesn't do much of anything useful but it should serve as a good
starting point. You will see that it is *very* easy to create a SL for NSBasic
using PP Compiler.
First, you should download the needed files:
1) PPNSBasicLib.pas - It's our PP source code in Palm DOC format (PDB).
2) PPNSBLibTest.prj - It's our NSBasic project to test our new SL.
3) PPNSBLib.inf - It's our "inf" file, describing each function as an
interface between SL and NSBasic.
4) PP Compiler Enviroment - It's a merged enviroment in a SSF file.
You can download all of them
clicking here (252 Kb).
You can see a brief description of them here.
I adapted this example from the Shared Library example that comes with PP
Compiler.
If you wish to take a look at PP source code before continue reading,
click here.
As I said, it is meant to be a
template for
other SL and you will verify that is quite simple to insert your own
functions using this template.
The two functions in the shared library example demonstrate just
an addition and a multiplication. I tried to make this example both simple and comprehensive enough to be
useful.
Important: Anything starting with "THIS" means that it belongs to "this"
library. Since this example is only meant for use with NSBasic programs, you can safely
leave the "THIS" in your own libraries because NSBasic uses the information in
the .inf file and not any identifiers in the code itself.
In order to make things straight forward our objectives, I created a special
PP Compiler enviroment using a SSF file that you can open with your PalmOS
Simulator. Last version should be installed with NSBasic 4.0. If you don't
have Simulator 5.3, please, download it
here.
As soon as you have it running, you would see these three icons in "Unfiled"
category: Piaf, PP Shell and PPNSBLibtTest.
Following these screenshots, you will be able to
compile your first Shared Library. After, using some Pascal knowlegde, you
will be able to, sooner than you can imagine, try some modifications or even
a total new Shared Library. Hope you share it with us :)
Later, if you wish to create your own PP enviroment, using your own Palm
device, for example, just follow this
link. Or, if you
wish to edit your SL in a Windows IDE, you may use Fozzy.
There are some curiosities, just in case you would
like to know. You don't need.
Well, that is enough to get started. Don't forget to study our template.
Print it as a quick reference.
| PPNSBasicLib PAS File - PalmOS Pascal Compiler Library source code |
| function
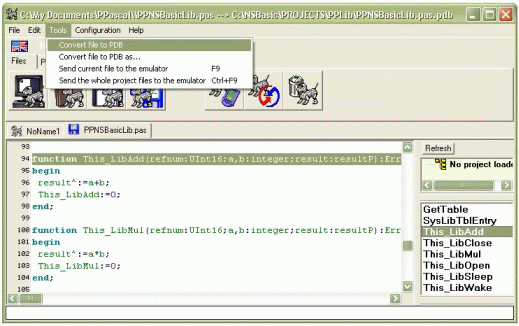
This_LibAdd(refnum:UInt16;a,b:integer;result:resultP):Err; begin result^:=a+b; This_LibAdd:=0; end; function This_LibMul(refnum:UInt16;a,b:integer;result:resultP):Err; begin result^:=a*b; This_LibMul:=0; end; |
| PPNSBasicLib INF File - NSBasic INF source code |
| [General] ExtensionName=PPNSB PrcName=PPNSBasicLib.prc Version=1.0 Manufacturer=Adrian Nicolaiev - http://www.niconnect.com InfVers=2.0 [GlobalMethods] PPNSB_ADD=1, func, 2, "PPNSB_ADD(in a as integer, in b as integer) as integer" PPNSB_MUL=2, func, 2, "PPNSB_MUL(in a as integer, in b as integer) as integer" |
| PPNSBLibTest PRJ File - NSBasic Project source code |
| Startup() LoadLibrary PPNSBasicLib.inf Object() result = PPNSBasicLib.PPNSB_ADD(aa,bb) MsgBox Str(result) result = PPNSBasicLib.PPNSB_MUL(aa,bb) MsgBox Str(result) |
 |
 |
|
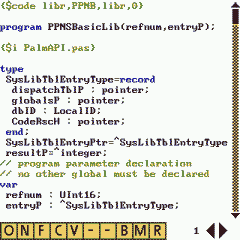
Screenshot 01 After starting Piaf, click on "O" and choose PNSBasicLib.pas. Click OK. |
Screenshot 02 You should see this source code. |
 |
 |
|
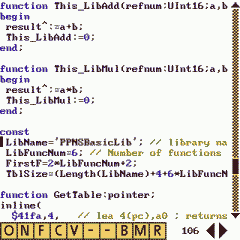
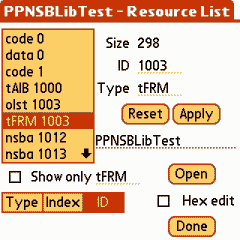
Screenshot 03 These lines show the two simple functions Add and Mul. Here you can see the Shared Library name too. |
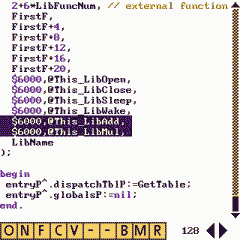
Screenshot 04 Here, you see the last lines of our Shared Library. Add and Mul are the last ones, after Open, Close, Sleep and Wake (internal functions - don't worry about them - just KISS) |
 |
 |
|
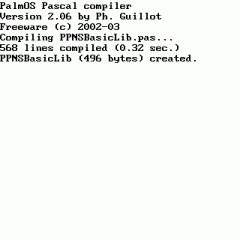
Screenshot 05 To compile, just click on "B". It took 0.32 seconds to compile 568 lines in my computer. |
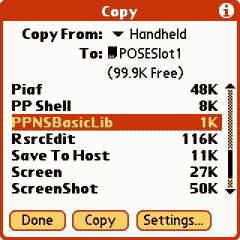
Screenshot 06 Next step: Go to Launcher Applications menu and choose "Copy...". |
 |
 |
|
Screenshot 07 Choose PPNSBasicLib. Verify that "Copy To:" is set to POSESlot1, your simulated Expansion Card. So, look at \Card1\PALM\Launcher\ folder in your Simulator folder. PPNSBasicLib.prc should be there after "Copy". |
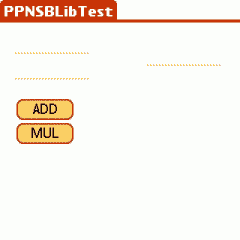
Screenshot 08 Are you read to test? Start our PPNSBLibTest program. That one you compiled in NSBasic. |
 |
 |
|
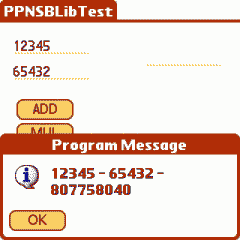
Screenshot 09 Choose your numbers and get a MUL result |
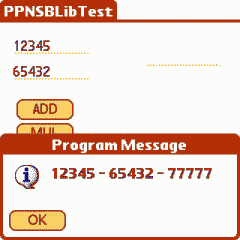
Screenshot 10 Choose your numbers and get an ADD result |
 |
 |
|
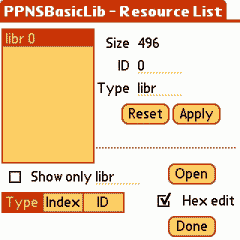
Curiosity 1 Q.: But, how is PPNSBasicLib inside? A.: It just has our famous "libr" resource |
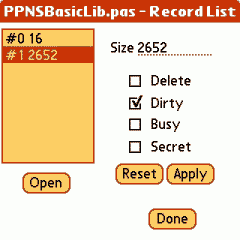
Curiosity 2 Q.: And PPNSBasicLib.pas? A.: It is just a Palm DOC file, with a header and our Pascal source code in the second record. If you wish, you may open this file in any Palm DOC reader. |
 |
 |
|
Curiosity 3 As I said, here it is our Pascal source code... |
Curiosity 4 Here, we have an inside view of our PPNSBLibTest program created with NSBasic. |
 |
|
Fozzy is a free IDE for PP Compiler. You may download the latest version here. |
After that, you will be able to start creating your own libraries.
Good luck ! (You won't need :)
Adrian Nicolaiev
http://www.niconnect.com